What's Inside
- Why a Firm Anchor Comes First
- Keep Tight Wire Off Delicate Roots
- Prepare Drainage Holes and Thread the Wire
- Leave the Wire Ends Ready Before Planting
- Secure the Root Mass and Check for Movement
- A Stable Tree With Uncrushed Roots
- The Final Check
Why a Firm Anchor Comes First
A firm anchor matters more than a perfect planting angle immediately after repotting. A tree can look settled in its shallow pot yet pivot when you carry it to a bench or water it. That movement disturbs contact between freshly cut root ends and the substrate around them, just as new roots need a steady place to grow.
Set the planting angle before you tighten the wire, then give stability priority. You will prepare the pot, route aluminum anchoring wire, secure the root mass, and check for movement. Each part has a separate job: the wire holds the root plate still, while substrate supports the roots beneath and around it.
Keep the finished test in mind as you work. With one hand steadying the pot, you should be able to touch the trunk just above the nebari and rock it gently without seeing the soil surface lift. The aim is a seated tree, not a tree forced into place by a tight loop.
Keep Tight Wire Off Delicate Roots
Where can the wire bear safely? Look for a firm, woody upper part of the root plate or a compact edge of the old root ball. A thin feeder root, a prominent fleshy root, and the bark at the trunk base offer poor bearing points. Pressure concentrated along a narrow wire can crush tissue or mark bark, even when the tree initially feels secure.
Protect The Root Flare
Restrain the root mass without cinching wire against feeder roots or the trunk. If a wire touches a prominent root and you cannot choose another route, place a short sleeve of rubber tubing, folded drainage mesh, or a strip of pot screen beneath it to spread the pressure. Stop tightening if a root begins to indent.
Watch the pot as well as the tree. Keep the wire beside the open area of each drainage screen, and place the finished twist where it cannot obstruct water leaving the pot. If another turn draws the tree downward and buries the nebari, that turn is working against the planting position. Ease the wire back and change its path.
This distinction helps when the trunk still wobbles at the end of a repot. The instinct to add tension is understandable, but first check what the wire is holding. A loop resting on loose surface substrate cannot reliably restrain the root plate beneath it.
Prepare Drainage Holes and Thread the Wire
Gather the bonsai pot, soft aluminum anchoring wire, drainage mesh, wire cutters, and the tree with its roots ready for planting. Pliers can help with the final twist. Set everything beside the pot before you add substrate; routing wire around a balanced, partly planted tree makes a careful job harder.
Give Mesh And Anchoring Wire Separate Jobs
Cut mesh slightly larger than each drainage hole. Pin each piece with its own small hairpin of wire: pass the hairpin down through the mesh and spread its ends underneath the pot. The mesh retains substrate while leaving a path for water. Its little pin does not anchor the tree.
Now inspect the available openings. A pot with tie-down holes on either side of a central drain offers a direct route across the root plate. If the pot has accessible drainage holes instead, choose a pair that lets the wire cross a firm part of the root mass without covering the drain openings. Corner holes in a shallow rectangular pot may require a diagonal route. The pot determines the crossing angle, so check where the roots will sit before cutting wire.
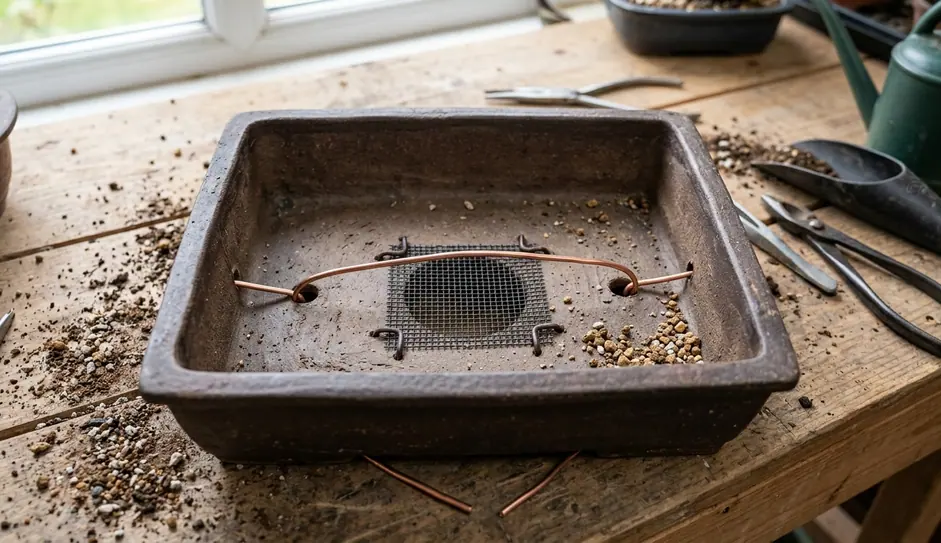
Thread the anchoring wire from underneath so its ends emerge inside the pot. Seat the span against the pot floor; a bowed-up span can hold the first layer of substrate away from the pot. Leave each end long enough to reach across the planned root position and allow several turns to join the ends. Cutting the ends short now leaves little room to adjust the route later.
A pot with only one central drainage hole and no tie-down openings calls for another anchoring arrangement, such as a cross-bar beneath the hole. That setup falls outside this two-end routing sequence. Choose a pot with suitable openings for this walkthrough rather than trying to make the mesh pin hold the tree.
Leave the Wire Ends Ready Before Planting
Before adding substrate, lift the tree over the pot at its intended height and front. Look down at the exposed roots and imagine each wire end crossing the root plate. Do both ends reach firm bearing points? If they land on the same side, or would meet over open substrate, re-thread the wire while the pot is empty.
Keep Ends In Sight
Bend the loose ends gently outward over the pot rim while you position the tree and add substrate. They will stay visible and easy to retrieve instead of disappearing under the first handful. Use a smooth curve rather than a sharp kink, especially near the place you expect to twist.
This quick rehearsal also reveals whether a planned crossing would run across the trunk flare. Shift the route now, when you can see the whole root spread. Once the first layer of substrate goes in, preserve the chosen path by keeping both ends clear of the planting area.
Secure the Root Mass and Check for Movement
Set a first layer of substrate beneath the tree and position it at the chosen height and front. Check that the root plate has support rather than balancing on a mound with an empty space beneath one side. Hold the trunk steady as you bring the wire ends inward.
- Cross firm root-plate surfaces. Guide each end over a stable, woody area or compact edge of the old root ball. Keep the wire off pale feeder roots and away from the trunk bark. If you need protection at an unavoidable contact point, place it before applying tension.
- Join the ends gradually. Bring the ends together and twist just enough to take up slack. Pause after a couple of turns to look at every bearing point. Continue in small increments while keeping the tree at its chosen angle and height.
- Stop when the root plate stays seated. If twisting changes the planting angle, sinks the wire into a root, or draws the nebari deeper into the pot, loosen the wire. Reroute it across a sounder bearing point before trying again.
- Fill the remaining spaces. Add substrate around and beneath accessible roots while you hold the tree in position. Use a chopstick or thin dowel with short vertical pokes to settle substrate into voids. Avoid stirring under the root plate, which can disturb the seating you have just established.
The wire prevents rocking; substrate supports the roots. A taut loop cannot fill an air space beneath the plate, and extra twists cannot correct a planting angle that shifted during tightening. Keep those tasks separate as you finish the pot.
For the movement test, hold the pot steady on the bench. With your other hand, gently move the trunk near its base from side to side, then front to back. Watch the soil surface at the trunk. It should stay closed against the root plate rather than lifting or opening a gap. Use a light touch: you are checking for play, not testing how much force the anchor can withstand.
After repotting, keep the tree out of strong wind and away from vibrating surfaces while roots re-establish. Move it only when necessary, and water according to the species, substrate, and local conditions rather than a fixed calendar. The anchoring wire can remain while new roots knit the plate into the substrate; reassess it at the following repot.
A Stable Tree With Uncrushed Roots
A sound anchor comes down to three observations: the wire bears on a firm part of the root plate, the twist holds without visibly compressing roots, and the trunk stays still when tested gently. Firmness alone tells you less than it seems. A wire pulling the whole tree downward can make it feel secure while leaving poor substrate support beneath the roots.
Check The Bearing Points
Route the wire across stable root mass, apply only enough tension to prevent rocking, and use the final movement test to confirm that the soil surface stays seated. If the trunk moves, inspect the route and the support under the roots before tightening further.
Start troubleshooting by looking at the crossing angle. Does the wire pass over the root plate, or only clip its edge? Next, check for a void under the side that lifts. Finally, make sure the loop rests on firm root rather than loose surface substrate. Correct any of those problems before adding another twist.
Finish the anchoring work with a gentle test at the trunk base while holding the pot steady.
The Final Check
Once the wire is twisted and the pot is filled, the mechanical anchoring is complete. Before setting the newly potted tree on its bench, hold the pot steady and gently test the trunk near its base for movement. A solid, unyielding trunk confirms the root plate is secure, ensuring new roots can grow into the substrate without being disturbed by wind or daily watering.